- Home
- Soundproofing
- Soundproofing Solutions
Soundproofing Solutions
When you’re selecting soundproofing solutions, it's often several solutions put together to produce a wall or floor soundproofing assembly. This page provides a review of the individual components of soundproofing solutions in terms of the types of products available for walls and floors and how they work. It brings together all the possibilities to make it easier for you to make a decision on the best soundproofing solution for your project.

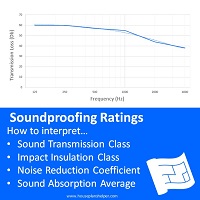
Make sure you take a look at soundproofing ratings so that you can understand how the performance of soundproofing solutions is measured.
Also remember that many of these soundproofing solutions contribute to the heat insulation and fire retardation of your walls and floors - it's a win-win.
Soundproofing solutions considerations
There are a number of things to consider...
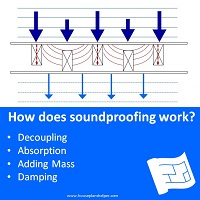
- How it works - noise reduction methods used - see how does soundproofing work?
- Added thickness – some of the products and methods will add quite a bit of thickness to your wall or floor. If you’re short on space, this is something you’ll definitely want to keep an eye on. On the flip side, thick walls can make your home feel more solid and substantial.
- New build / remodeling - Some products and methods can be retro-fitted, others not.
- Cost – always important
- Extra materials
- Extra labor - Installation
- How is it installed?
- Is expert installation required? Is DIY installation possible?
- How much time does it take to install?
- What’s the risk that the installation can be carried out incorrectly resulting in compromised soundproofing rating?
Soundproofing Solutions List
So let’s get going on those soundproofing solutions. We’ll be looking at the following…
- Doubling up on material layers
- Soundproofing glue
- Decoupling the studs
- Acoustic drywall
- Acoustic insulation
- Mass loaded vinyl
- Soundboard (fiber board)
- Resilient channel
- Sound clips and hat channel
- Joist isolators
It's a good idea to read about how soundproofing works to understand how these methods contribute to soundproofing.
Summary
Here's a summary of soundproofing solutions if you just want the quick read...
NOTE - The STC contribution shown is when then solution is compared with a standard 2x4 stud, 24” oc wall with ½ inch dry wall on each side.
Note that STCs cannot simply be added up the assembly of the wall or floor as a whole needs to be taken into account.
I worked out the majority of the STC contributions using this calculator.
| Soundproofing solution | Extra thickness | STC contribution (see note above) | Risk of not realising performance | Extra Cost |
|---|---|---|---|---|
| 5/8 inch drywall (Each side) | ¼ inch | 2 | Low | $1 more than ½ inch drywall for a 4x8 sheet Plus installation |
| Double drywall(5/8 each side) | 1 ½ inches | 7 | Low | $26 in extra dry wall Plus installation |
| Acoustic drywall (Quiet Rock) | None | 15 | Low | $54 per sheet $41 per sheet No extra installation costs |
| Sound board | ½ inch | 5 | Low | $30 per sheet (also need drywall) Plus installation |
| Standard insulation | None – goes inside the wall | 2 (mainly NRC) | Low | $14 for 4x8sqft area Plus installation |
| Soundproofing insulation | None – goes inside the wall | 3 (mainly NRC) | Low | $30 for 4x8sqft area Plus installation |
| Mass loaded vinyl | 1/8 inch | 8+ depending on thickness | Low | $41 for a 4x8sqft area (1/8” thickness) |
| Soundproofing glue and extra sheet ½ inch drywall on one side | ½ inch | 7 | Low | Glue - $20 for a 4x8 sqft area $13 for extra drywall Plus installation |
| Resilient channel | ½ inch | 3 | High | $1 per square foot Plus drywall Plus installation |
| Soundproof clips and hat channel | 1 ½ inches | 3 | High | $60 for 4x8sqft area $100 for a 4x8 area including labor Plus drywall |
| Staggered studs | 2 inches | 10 | Low | At least 1 ½ times that of standard wall |
| Double studs | 6 ½ inches | 13 | Low |
At least 1 ½ times that of standard wall |
Doubling up on material (walls or floors)
This method can be used for both walls and floors or ceilings. I’ve used the word ‘drywall’, so if you're thinking of a floor just substitute plywood or sub-floor.

How it works
Adding a layer of drywall to either one or both sides of your walls will add mass and therefore increases noise reduction.
Added thickness
Typically it’s best to add 5/8 inch drywall or thicker. This doesn’t add too much thickness, less than an inch if you add it to both sides of your wall.
New build / remodeling
Yes, you can add extra drywall to existing walls.
Cost
- Materials - Just find out how much drywall is and it won’t take too long to figure out your materials cost.
- Labor - A contractor will be able to give you a price on installation depending on whether or not you’re building a new wall or retrofitting. Remember that there’s the installation of the drywall, then the plastering.
- Get a quote. (search for soundproofing)
Installation
- The installation is simple, just the same as drywall, although it’s important to stagger the joins in the drywall to keep noise creeping through gaps to a minimum. Both layers should be drilled into the studs. Remember that longer screws will be required for the second layer.
- There’s no need for expert installation, it’s just normal drywall. The installation of the drywall would be a good job to do yourself but you’ll probably still need a professional to do the plastering.
- It takes extra time in comparison to a standard wall because there’s an extra sheet of drywall. It doesn’t work as well if the double layers are screwed in at the same time, unless you figure out some way of staggering the seams and doing this (which you could do for a floor).
- So long as the gaps are staggered, it’s hard to botch the installation of a double layer of drywall.
Soundproofing glue
Soundproofing glue can be used in both wall and floor assemblies.

How it works
Soundproofing glue is a viscoelastic polymer which uses the principle of damping to reduce noise transmission. It’s used between two layers of drywall, plasterboard or between layers of plywood in a floor.

Added thickness
A soundproofing glue fits in between two layers of material (drywall or plywood). The thickness of the glue layer is negligible so the added thickness is that of the extra layers of drywall or plywood used.
New build / remodeling
Soundproofing glue is suitable for new build and remodeling projects. It can be added along with an extra layer of material to existing walls and floors.
Cost
- Materials – soundproofing glue will cost around $20 for a 4x8 sqft area (or per sheet of drywall), then there’s the cost of the extra drywall.
- Labor - A contractor will be able to give you a price on installation depending on whether or not you’re building a new wall or retrofitting. Remember that there’s the installation of the drywall (and glue), then the plastering.
- Get a quote (search for soundproofing)
Installation
- Since using soundproofing glue requires two layers of material, the installation comments above about doubling up on material apply.
- The first layer of material should be installed, then the soundproofing glue should be applied to the second layer, then the second layer installed on top of the first.
- It takes extra time in comparison to a standard wall or floor because there’s an extra sheet of material and glue to install.
- There’s no special training required to install a soundproofing solution using soundproofing glue so your contractor can do this job, and it’s suitable for DIY.
- As long as the glue is uniformly applied, there is little risk that a shoddy installation can compromise the soundproofing rating.
Popular products
Green glueDecoupling the studs / joists
This method can be used in walls and floors.
How it works
As the name suggests, this soundproofing solution works due to the decoupling principle.
Decoupling the studs has two methods:
- Staggering the studs
- Using double studs
Added thickness
This soundproofing solution increases the wall thickness more than any other soundproofing solution.
Staggering the studs on a 6 inch plate is a 2 inch increase in comparison to a standard 2x4 stud.
Using double studs adds 6.5 inches to the wall thickness in comparison to a standard 2x4 stud.
New build / remodeling
Staggering studs isn’t really practical for existing walls. You could certainly build a second wall, effectively creating a room within a room. This would be effective but would eat up quite a bit of floor space.
Cost
- Materials – find out the price of 2x4 studs and you can soon calculate the cost of materials. Studs should be 24 inches on center (24 inches apart).
- Labor - A contractor will be able to give you a price on installation.
- Get a quote. (search for soundproofing)
Installation
- Staggered or double stud walls are installed using standard framing techniques.
- There’s no expertise required beyond the professional skills of a framer. If you can frame, you could do this job yourself.
- It’s a lot of extra work, and therefore a lot of extra time to build these types of walls.
- Provided that you specify clearly what you want in the framing layout, there’s little risk of the installation being done improperly.
Acoustic drywall
Acoustic drywall can be used on walls or ceilings.
How it works
Acoustic drywall is essentially two sheets of drywall with soundproofing glue in the middle which works using the damping principle. It offers the same advantages as using soundproofing glue.
Added thickness
The beauty of acoustic drywall is that it’s available in the same thicknesses as drywall like 1/2“ and 5/8”.
New build / remodeling
It’s obviously suitable for new walls. If you’re remodeling it probably costs less to use soundproof glue and drywall rather than adding a layer of acoustic drywall.
Cost
At first glance acoustic drywall is expensive in comparison to a sheet of drywall but this increased cost can be offset against the fact that when construction a new wall, there’s no extra installation expenses.
- Get a quote (search for soundproofing)
Installation
- Acoustic drywall is installed in exactly the same way as standard drywall. Seams that are not backed by a stud should be sealed with a soundproofing seal.
- If you can put up drywall, you can put up acoustic drywall. There’s no particular expertise or training required.
- It takes no extra time to install.
- There’s a low risk of the installation being done incorrectly and compromising soundproofing performance.
Popular products
Acoustic insulation
Acoustic insulation can be used in both walls and floor / ceiling assemblies.
How it works
Acoustic insulation is thick and soft and works by absorbing sound in the airspace within a wall or floor assembly.
Insulation should be laid across around 80% of the void.
Added thickness
There’s no added thickness because the insulation sits within the wall / floor, in between the studs or joists.
New build / remodeling
You need to get to the inside the wall to add insulation so it means tearing off a layer of drywall if you’re remodeling.
Cost
- Acoustic insulation is more or less double the price of standard insulation.
- There’s no increased cost in installation above standard insulation.
- Get a quote (search for soundproofing)
Installation
- The batts are placed in between the drywall or between the studs if there are staggered or double studs.
- There’s no particular expertise or training required.
- It takes no extra time to install than standard insulation.
- Sometimes insulation can slip down the wall and sag, leaving a gap at the top. It’s important that the insulation fits snugly to prevent this.
Popular products
Mass Loaded Vinyl
When I was researching soundproofing solutions I found lots of companies with brand named soundproofing membranes. In general, these products are some version of mass loaded vinyl.
It comes in both black (for walls and floors) and transparent (for windows)

How it works
Mass loaded vinyl, as the name suggests, works by adding mass. It’s heavy stuff and comes in various thicknesses. It’s also floppy which means it also has noise dampening properties.

Added thickness
Mass loaded vinyl comes in several thicknesses. A popular thickness is 1/8 inch so it doesn’t add too much thickness at all. There are MLVs that are heavier and thicker available as well.
New build / remodeling
If you are building a new wall, you can install a layer of mass loaded vinyl between the studs and the drywall. If you’re retrofitting, the mass loaded vinyl can be fixed to the existing wall and a new layer of drywall installed on top.
Cost
- Materials - 1 lb/sf mass loaded vinyl can retail at about $3 to $4/sf.
- Labor – Installation should be around $1/sf.
- Get a quote. (search for soundproofing)
These costs might be less if you’re doing your whole home. Remember that if you’re retrofitting, you’ll need to add the cost of the drywalling materials and installation.
Installation

- Mass loaded vinyl comes in sheets. It can be installed between the studs and the drywall or between two layers of drywall. If you have a staggered stud arrangement, the mass loaded vinyl can be hung in between the two layers of studs.
- The sheets of mass loaded vinyl should be installed to overlap at the seams.
- Some companies supply glue and/or tape for the seams and others don’t. It seems to me that using glue and/or tape will reduce the risk of flanking leaks.
- There’s no particular expertise required as long as the installation instructions are followed. You could certainly install it yourself, but you’ll need a buddy to help you hold it up because it’s so heavy.
- It takes extra time in comparison to a standard wall or floor because there’s an extra step to install the MLV.
- It’s fairly easy to install and provided the seams are overlapped and the edges flush with the floor and ceiling you’ll see a good noise reduction.
Popular products
Mass loaded vinylSoundboard (acoustic fiber board)
There are soundboard products available for both walls and floors.
Just to be clear, I'm referring to soundboard for installation as part of a wall assembly, rather than panels that are installed on top of the wall assembly.
There are also insulation products, usually foam boards, that also have some soundproofing qualities, but I'm not talking about foam based products in this section.
How it works
Soundboard is a type of fiber board which has some noise dampening and absorption qualities. Note that it isn’t as heavy as a sheet of 5/8” drywall so while it does add some mass, it’s not as much as drywall.
Added thickness
Soundboard comes in a variety of thicknesses. It starts at 1/2 inch thick.
New build / remodeling
There are different types of soundboard on the market. Some are suitable for installing straight onto the stud wall, others need to be sandwiched in between two sheets of drywall.
Cost
- Materials - I found sheets at $30.
- Labor - A contractor will be able to give you a price on installation depending on what’s required for the installation.
- Get a quote. (search for soundproofing)
Installation
- Since there are several flavors of soundboard available, installation methods vary. Some sound boards require that the outer layer of drywall is screwed into the soundboard rather than the studs. This will reduce the amount of weight that can be fixed to the walls such as shelves. The principles of staggering studs and applying any soundproofing tape or seal to the seams may well apply.
- Seams should be taped and staggered
- It’s suitable for a DIY job.
- It’s fairly easy to install so as long as the instructions are followed, the expected soundproofing performance should be achieved.
Resilient Channels
Resilient channels can be used in walls and for hanging ceilings.

How it works
Resilient channels work by decoupling the surface of the wall or ceiling from the studs or floor joists. There’s very little direct connection between the surface that receives the sound and the parts of the wall or floor assembly that transmit the sound through the structure.
Resilient channels can be made from metal of different thicknesses (gauges). You can hang one or two layers of plasterboard from a resilient channel. For two layers, you’ll need a resilient channel in a thicker gauge for it to have sufficient strength.
Added thickness
The resilient channels themselves are around ½ inch thick. Then you can hang one or two sheets of drywall from the resilient channel.
New build / remodeling
You can add resilient channels to existing walls or ceilings but the results won’t be as good to the extent that it might not be worth it. Expected soundproofing results are quoted with the installation of the resilient channels onto the studs.
Weight restriction

Because the drywall is not directly attached to the studs, you can’t mount anything heavy on a wall that’s using a resilient channel system. Same goes for the ceiling.
Cost
- Materials - The channels themselves are fairly inexpensive and should cost you around $1 per square foot. Then you’ll need to add the cost of the plasterboard.
- A contractor or soundproofing company will be able to give you an installation cost.
- Get a quote (search for soundproofing)
Installation
A resilient channel is a long strip of metal that is drilled across the studs horizontally and then the drywall is attached to the metal strips.
In a ceiling assembly, the resilient channels can be attached to the bottom of the floor joists and then the plasterboard for the ceiling screwed into the metal strips.

Here’s a few tips on the installation of resilient channels...
- Make sure you install the channels the correct way up (mounting strip to the bottom)
- Make sure the screws that mount the drywall to the channel don’t go all the way through to the studs – this reduces the effectiveness of the decoupling.
- Follow the instructions regarding spacing carefully
- Splice one channel over the other to get the length you need.

- This job requires is essentially pretty basic, however given all the ways that the installation can go wrong, it may be worth getting the job done professionally to avoid these pitfalls.
- It doesn’t take too much extra time to install the channels.
Installation risk
The most common cause of failing to get the expected soundproofing performance from resilient channels is from mistakes made during installation.
Wear and tear
Once installation is completed correctly, there’s still a chance that the soundproofing performance might be compromised. If furniture is pushed up tight against the wall to the extent that the resilient channels become depressed and the drywall is effectively now directly in contact with the studs, the performance will be compromised.
If pictures or light shelves are hung and screws are put in directly into the studs, this will essentially mean that the surface of the wall and the studs are now in contact and soundproofing performance will be lost.
Sound clips and hat channel
Hat channels and sound clips are similar to resilient channels. This system uses a clip which is installed onto the studs, then the hat channel (so called because its profile looks a bit like a hat) is clipped into the sound clip, then the plasterboard is installed to the hat channel.
They can be used on both walls and ceiling.

How it works
This system uses the principle of decoupling and the sound clips typically contain a material which also provides some damping.
Don’t use hat channels on their own without sound clips.
Added thickness
The added thickness depends on the exact assembly you choose but typically will add 1 ½ inches to your wall thickness.
New build / remodeling
As per resilient channels, this system is more suitable for installing directly onto the studs rather than on top of existing drywall (or ceiling).
Weight restrictions
Because the drywall is not directly attached to the studs, you can’t mount anything heavy on a wall that’s using a resilient channel system. Same goes for the ceiling.
Cost
The clips are expensive – about $5 per clip. Cost for clips, channels and labor work out at approximately $5 per square foot.
Get a quote (search for soundproofing)
Installation
Here’s a few tips on the installation of resilient channels...
- Make sure the screws that mount the drywall to the channel don’t go all the way through to the studs – this reduces the effectiveness of the decoupling.
- Follow the instructions regarding spacing carefully
- Splice one hat channel over the other to get the length you need.
- This job requires is essentially pretty basic, however given all the ways that the installation can go wrong, it may be worth getting the job done professionally to avoid these pitfalls.
- Because this is a three step process, clips, channels, drywall it takes a quite a bit of extra time to install this system.

Wear and tear
If pictures or light shelves are hung and screws are put in directly into the studs, this will essentially couple the surface of the wall to the studs and some performance will be lost.
Joist Isolators
Joist isolators or floor floaters are for use in floors only.
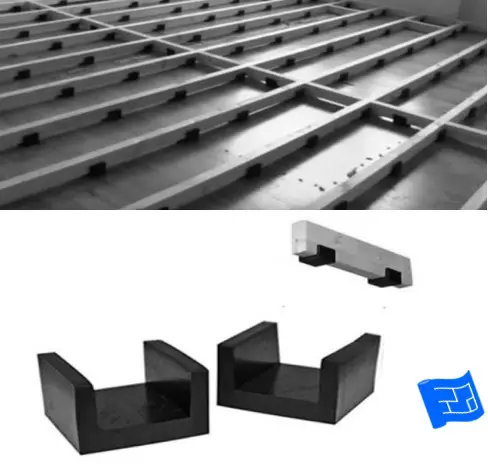
How it works
Joist isolators work by dampening the vibrations of sound.
Added thickness
The rubber joist isolator will add about ½” to your floor assembly, then there’s the dimensions of any extra joists or extra sub-floor depending on what else is in the specification of your assembly.
New build / remodeling
Joist isolators are generally used in retrofits, to float a second set of joists on top of current sub-flooring.
They can be used in new build floor assemblies to float the sub-floor on top of the joists.
Cost
- Materials – the joists cost about $2.50 each
- Labor – there’s no screws required so the labor component of installing the joist isolators should not be too onerous.
- Get a quote (search for soundproofing)
Installation
The joist isolaters should be installed every one or two feet along the floor joists, positioned beneath or on top of the floor joists as the assembly demands.
They’re very easy to install as they just push down (or up) onto the floor joists.
So long as the correct spacing is used, there’s very little risk of installation errors compromising the soundproofing performance.
More about soundproofing


|
|
All information on this website is presented as guidance only. You are responsible for your project and hiring any necessary professionals.
Copyright © 2012-2026 All Rights Reserved