- Home
- Lighting Design
- Lighting Design Techniques
Lighting Design Techniques
On this page I run through the basic lighting design techniques that you can use for decorating with light. It's like a catalog of ideas and there's a little bit of discussion on each idea. There's no way I can cover everything on this page but the discussion should get your ideas flowing and help you think about what lighting might work well in your home. The ideas on this pages are used and expanded upon for each room in the house. You can do a bit more exploring lighting room by room from the home lighting design page.
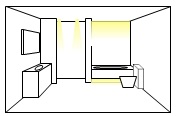
The images on this page are very simple for a purpose. I'm trying to help you think about lighting with an analytical mindset rather than clouding the message with interior design photos.
This is a loooong page. Here's a quick way to get to each section on this lighting design techniques page.
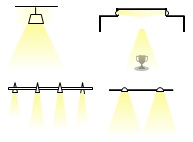
- Ceiling pendant lights
- Ceiling dome lights
- Ceiling lantern / skylight
- Ceiling recessed down lights
- Track lighting
- Cove and coffer lighting
- Wall mounted lights
- Floor lighting
- Shelf lighting
- Object lighting
Ceiling Pendant Lights
Perhaps the simplest form of a pendant light is a single light bulb hanging on a wire with a shade. When you're deciding what shade to use the first thing you'll probably think about is what shape and size. Don't forget to also think about the lighting design techniques you can get with different lamp shades.

With this solid shade light is projected downwards with no light shining onto the ceiling. This shade creates a lot of atmosphere. It would probably be best suited to a light over a desk or a dining table.

This shade is also solid and projects light both downwards and upwards. If your ceiling is painted a light color any light that is projected onto the ceiling will be reflected down into the room.

A translucent shade (light will shine through it but you can't see through it) means that the light will shine all around the room. This is probably the best option for general light from the ceiling.

More on the role of lampshades in lighting design techniques
Don't overlook the role of the lampshade in all of these lighting design techniques...
- Have a think about the insides of your lampshades. A reflective lining perhaps in gold or silver can look great and increase the amount of light into your room. You could even get an image put into the lining of your lampshade but this might absorb rather than reflect more light.
- You could also consider getting a translucent diffuser put on the bottom of your lampshade to hide the bulb entirely.
- There are also lampshade designs available that will add a bit of sparkle using crystals in the design or by punching out holes in a solid shade. Here's an extreme example!
A modern take on the pendant light is to put lots of small pendants together to form a chandelier.

Bare bulbs
There was a time when a bare bulb would mean that you hadn't quite finished decorating but now there are some really good looking bulbs where the whole point is to show off the beauty of the filament without a shade. You can have a look at some cool light bulbs on the which light bulb page (on the way).
Multi-light pendant lights
The two examples to demonstrate the multi-light lighting design technique are both pretty traditional but there are many chandelier designs out there that would suit a more modern look.

Chandeliers use small bulbs which give a soft glow. Some chandeliers have shades on the bulbs. If there are no shades it's a good idea to use frosted light bulbs to avoid glare.

This type of glass lantern fixture is great in hallways or staircases.
Ceiling Dome Lights
Another simple ceiling light fixture is a ceiling dome light. This is useful in rooms with lower ceilings. You could pick either a translucent dome for a soft glow or perhaps a glass dome with facets cut into it to throw an interesting pattern around the room.

Ceiling lantern / skylight
Another way of lighting from the ceiling is to have a large light box attached to the ceiling or in line with the ceiling.

A light box is usually made up of several fluorescent tubes set behind a translucent surface mounted from the ceiling. It provides good general lighting, but can feel a little institutional.

Ceiling skylights usually let in daylight during daylight hours and then are lit from behind during darkness. This type of lighting is particularly suitable for the tops of stairwells. If there's a bit of money to spend on getting a paneled or leaded glass skylight designed and made it's well worth the money to make the most of this lighting design technique.
Ceiling recessed downlights

Ceiling recessed downlights are so called because they are built into the ceiling. They are available in different beam widths from 0 to 60 degrees. The beam width and the distance between the lights will determine the pattern that's made on the floor and walls.

They can be used individually or as a group to light a wall (wall wash) when placed close to the wall or to provide more general room lighting when placed further from the wall towards the middle of the room. There are many possibilities with this lighting design technique depending on the combination of beam width, distance between fixtures and distance from the wall.
If you're interested in finding out how many lights you need in a room take a look at the lighting calculation page.


Directional recessed downlights where the light can be pointed in a particular direction are also available. This can be particularly useful for lighting artwork from the ceiling.

Or perhaps to light up the area around a chair to provide task lighting for reading.


Alternatives to recessed downlights
If your ceiling doesn't allow for downlights you could consider using surface mounted downlights or track lighting on the ceiling or on the wall to generate the same effect.
Track lighting
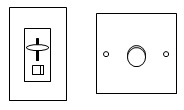
Track lighting is a great way to use the same lighting design techniques explored above for recessed lights if there's no space available for recessed lighting. It's also a very affordable lighting design option. When you're shopping for a track lighting solution think about where the transformer will go and try and find a track lighting solution that is dimmable.
With most track lighting systems, the direction of the beam for each fixture can be set individually.

Let how you want to light the room dictate how the track lighting should be laid out.
There are curved shapes available if track lighting is the lighting design technique you decide to go for.

Another type of track lighting is wire track lighting which is made up of a set of wires under tension from which the fixtures are suspended. I've seen these systems installed with the wires running vertically from floor to ceiling rather than across the ceiling.

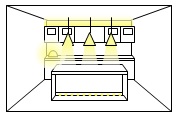
Cove and Coffer Lighting
This is my favorite lighting design technique for adding atmosphere to a room but it costs because a coffer or dropped ceiling require architectural work to the ceiling.
You can see how the coffer (below) hides the light source and creates a glow on the ceiling. If a dimmer switch is used this lighting design technique can create a lovely atmosphere turned down low.

Here's the arrangement for ceiling lighting. Again the light source is hidden and in this case the glow is directed onto the walls. A dimmer switch is advisable here as well to get full benefit from a dropped ceiling lighting set up.

Here's another arrangement with a section of the ceiling raised with lights shining into the room from the sides of the raised section. This lighting design technique doesn't have quite the same effect as a ceiling coffer or dropped ceiling because the light source is exposed.


Alternatives to cove and coffer lighting
There are two alternatives for a coved or coffered ceiling lighting design techniques that come to mind.
- You can drop your arcitrave / coving (the architectural element that sits in the corner between the ceiling and the wall) just enough to install a rope light which will give a gently glow onto the ceiling.
- A rope light could be installed at the top of wall paneling. There might be a need to have a small riser to hide the rope light. This will give a lovely glow up the wall.
Wall mounted lights
Wall mounted lights are often called sconces. As well as the appearance of your fixtures think about the beam width and beam direction.
A thin beam width lighting design technique will create beams of light that stand out against the walls.

Here's a wall scone with a solid shade and a wide beam width. This set up is good if the wall lighting needs to provide or contribute to the general lighting levels in a room (ambient lighting) rather than provide lighting in the form of decoration (feature lighting).

A horizontal beam is perhaps a more unusual way to use a wall mounted light but I've seem it used effectively in tall narrow corridors to create a line for the eye to follow that's lower than the ceiling.

And if the wall lights you're using have a lampshade, have a think about what effect the lampshade will create. There are lapshades out there that are solid but with punched holes that can create a really interesting effect. Here's cool example.

You could always go for a classic chandelier sconce.

I've also seen light panels installed in walls which look great in homes with modern architecture. This lighting design technique could be given a more traditional spin with the use of leaded or stained glass.

Floor Lighting
The floor is perhaps one of the last areas we think of lighting or placing a light source. Creating a floor wash (a beam of light across the floor) is a great way of creating atmosphere so it's a good choice for mood lighting.

The fixture in the base board above would send a beam across the floor. How far would depend on the power of the light fixture. To create a floor wash across a wide floor area lights like these would need to be placed at intervals along the wall. You can work out the distance at which to place the lights by taking into account the width of the beam and the pattern you'd like to create on the floor.

This arrangement will create a line of light on the floor below the base board. Another method of implementing this lighting design technique would be to install rope lighting at base board level.

Floor light warning!
Floor washes created with floor lighting can look great but it highlights every piece of dust and dirt on the floor. The darker and dirtier your floors, the worse the problem. Just so you know.
Another lighting design technique for floor lighting is to use uplights in the floor to create a wall wash or highlight architectural features such as pillars. Again think about the interplay between the light beam width and how far apart the uplights are or how the beam width works with the feature you're trying to light.

Shelf Lighting
Shelf lighting can be applied to open shelves or shelves with glass doors. It's a great way to show off objects on the shelves as part of the feature lighting in a room. You can light shelves downwards or upwards. Light strips are an effective way to go about setting up shelf lighting. Notice in the picture below that the shelves have a slight lip on them to hide the light source.

Lighting a shelf upwards is a particularly good technique to use for a high shelf. Thin beam widths create patterns on the wall.


Another way to light shelves is from behind the shelf itself. This throws light on the wall above and below the shelf without lighting up the objects on the shelf to a great extent.

Now though not strictly a shelf I thought I'd put in lighting from curtain enclosures. You can go for lighting both and above the curtain enclosure.

Object Lighting
This section is just to get you to think about all the different angles from which an object can be lit - above, below, from the side, with one or several beams...
Let's start with an object lit from behind. This will emphasis the shape of the object and might detract a little from how the object looks from the front because the light behind will throw the front into shadow, particularly if there isn't much other light in the room. This lighting design technique would also cast an interesting shadow across the room.

Here's an object lit from the front. Lighting from the front highlights the front of the object and will throw a shadow onto anything behind. To light an object from the front the source of the beam needs to be at the same level as the object which means that a spotlight on the other side of the room is required. I have seen this done and it creates quite an effect because while the object is beautifully lit it can be hard to determine where the light is coming from especially if there's other light in the room. Careful thought is required though because it's no good having the beam cut across a room at a level that people are going to be constantly blocking it, or worse if it's going to shine into someones eyes.
So in practice it's hard to light an object from the front. If that's not possible for you try lighting from below instead.

This options lights up the front of the object. Because the light is directional in relation to the surface this option will highlight the texture on the front of the object. A shadow bigger than the object will be cast onto any surface behind.
Objects can be lit from below by placing them on a box which has a light fixture fixed inside in a position to shine up onto the object. Perhaps less elegant though equally good a solution is to use a clamp light attached to the surface upon which the object sits. If you go for the clamping option, it might be an idea to offset the lighting slightly to the side so that the clamp isn't directly in front of the object.

Lighting from below highlights the front of the object, including the surface texture as described above. Consider the shadow that will be created - which is the good side?
To make the shadow pattern symmetrical two lights could be used.

Now let's move to lighting from above. Since we've just been talking about using several lights let's look next at lighting from above with several lights. You can see how a symmetrical shadow is thrown down onto the surface. Light from above will accentuate the top of the object and will highlight any texture on the sides of the object.

Or you can light with just one light source of course.

I want to take the chance to talk about lighting plants. Plants lit from below throw really interesting shadows. This is particularly effective with big plants which sit in pots on the floor. You can use a floor light or a small light clamped to the pot.

More Home Lighting Design for you...
You might also enjoy reading these other pages on home lighting design.
Lighting know-how
Room by room lighting ideas
More Lighting Design
Lighting know-how
Room by room
lighting ideas


|
|
All information on this website is presented as guidance only. You are responsible for your project and hiring any necessary professionals.
Copyright © 2012-2026 All Rights Reserved